Running Mythic Bastionland
This summer I've been running two Mythic Bastionland campaigns—enough that I even paused my Dolmenwood game. I love this system, but I keep hearing the same questions: "How do I start? What should I prep?" I've even seen, "What is this book? There's nothing in it!"
In this post I'll share the tools and resources I leaned on, how I went from zero to a realm ready to explore, and how I keep iterating smoothly once play begins.
The good news: the Mythic Bastionland book already gives you everything you need. I'll show how I use it, where I borrow from other sources, and how I keep prep light so the game can breathe.
Let's get ready to play.
Get Ready
Before play, I aim for just enough prep to feel confident. The goal of this stage is simple: assemble a starter kit you can riff on at the table. By the end you'll have a usable hex map (homemade or borrowed), a Seat of Power with a few Holdings, sketched rulers with a couple spark-table details, a scatter of Myths and Landmarks, and a handful of names.
Make the Map
In Mythic Bastionland, realms and hex maps go hand-in-hand. The first hurdle is usually: how do I actually make a map?
Here are straightforward options:
- Official Realm Sheets: On the itch.io page you'll find a lovely example realm to populate and a blank sheet if you want to draw your own—which is genuinely fun.
- Hex Kit: A popular desktop option for quickly laying hexes. It isn't free, and you'll likely want a tileset or two or three.
- HexPad: A free browser option made for the Mythic Bastionland Jam.
Once you've picked a tool, you can follow the book's procedure (pg. 14): lay out clusters of terrain, then populate the realm. Or just sketch something that looks right to you—either approach works. If you prefer a walkthrough, Chris McDowall has a helpful livestream building a realm, and Gnomestones has a clear write-up: Map-Making with Mythic Bastionland.
Don't want to draw at all? No problem:
- Perilous Shores (by watabou) can generate a realm in seconds—tweak the hex grid and size to taste.
- Mythic Bastionland Tools: Realm Maker uses the official sheet tiles to spit out custom maps.
- Or just grab an existing map and call it a day. If you want to disguise it, invert, rotate, and/or flip it—if it's good enough for George R. R. Martin, it's good enough for us.
Pick whichever path gets you to the table fastest (or sounds the most fun). You can always redraw or refine later.
Populate the Realm
With a map in hand, drop in the moving parts. Here's the procedure I follow (slightly different from the book):

Bonus: Use the Spark Tables (pg. 22ff) to sprinkle detail wherever you feel thin.
Barriers first. Place barriers in roughly one-sixth of your hexes. Put them where the terrain suggests—rivers, cliffs, mountain spines—and sprinkle a few in odd spots to keep routes unpredictable. Speaking of rivers: if you want them to matter more, treat the river itself as a barrier, not just the hex edge.
Rulers second. Ask "Who's in charge?" If it's a Knight, roll one from the book (not a PC—unless you want them in charge!). If not, picture the kind of ruler you'd like: loyal vassal, religious authority, wealthy oligarch, etc. Then add texture with the People sparks—I usually roll the first three plus Heraldry, and add Background, Desire, or Ailment if I want extra spice. Roll relationships between rulers too; the results are delightfully messy—secret lovers, estranged friends, bitter rivals—and they instantly suggest problems to poke. To mix things up I sometimes use the excellent Maze Rats tables too. If you have other favourites, use them.
Then the Holdings. What does each place feel like? Roll the first three Civilisation tables to sketch the keep (I often assume a village or small town nearby). If I want more grit, I dip into the next three tables. I almost always roll Food because imagining what the knights get served is fun and surprisingly evocative.
Myths next. Roll your Myths and place their hexes. I like them spread out and tucked into remote or hard-to-reach terrain. Proximity matters—you're more likely to brush an Omen near its Myth—but manifestations can pop elsewhere depending on the rolls.
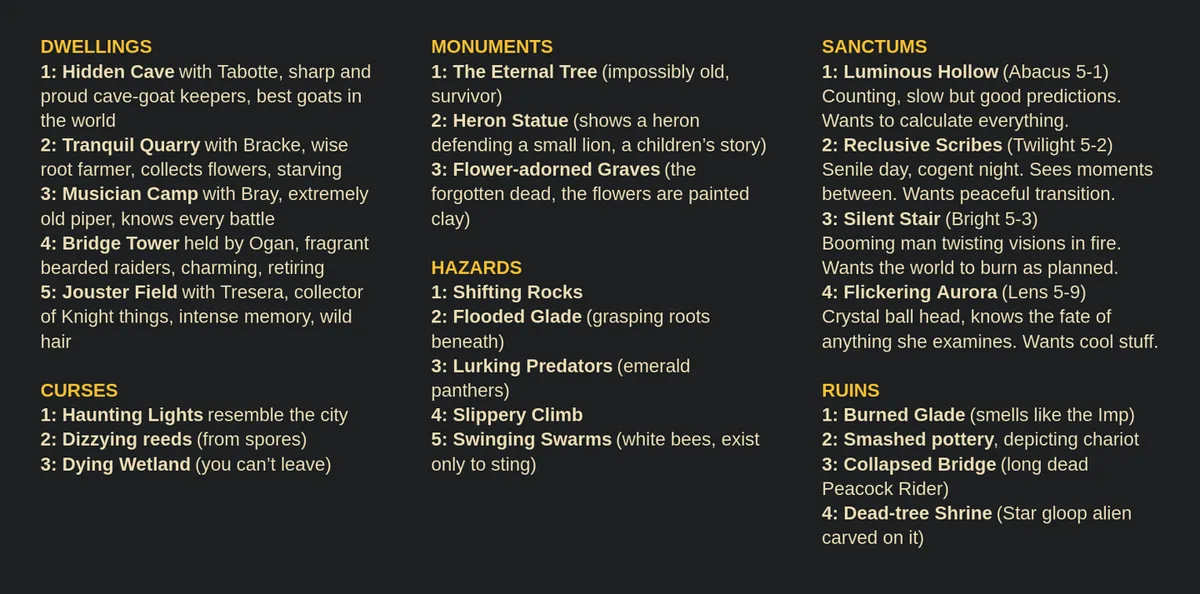
Lastly, Landmarks. I aim for at least three of each Landmark type, sometimes up to six. At the bottom of the Knight and Myth pages you'll find prompts for people, situations, beasts, names, and each Landmark type; roll them like a Myth to instantly get, say, a curse or a sanctum. If page-flipping is a pain, I built a quick generator. I also like to add a simple NPC to each Dwelling and roll a random Seer for every Sanctum.
Keep notes sparse. One or two lines per thing is plenty—you're building prompts for play, not prose for the shelf.
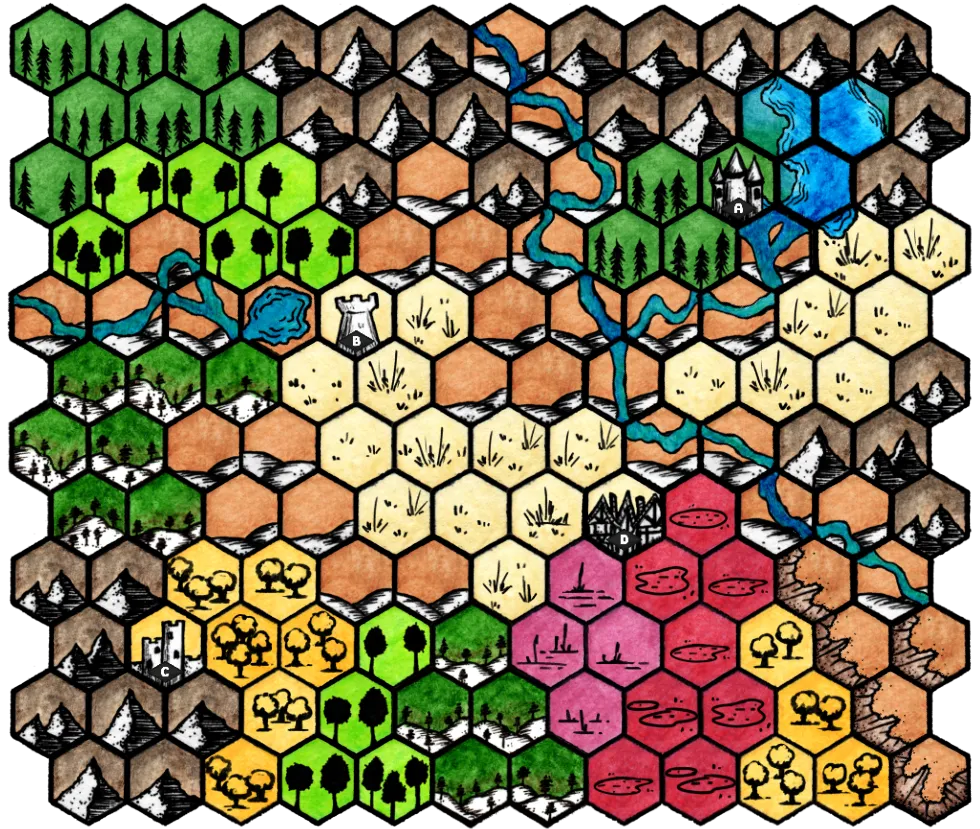
Chris McDowall shared a super-brief example of a realm on Discord; that nudge towards brevity has been a great inspiration. I tweaked the colours to fit the blog—apologies for the slight blurriness:

Do I Need More Prep?
Short answer: no. You already have everything you need to start and have a good time. When you need extra detail, reach for the Spark Tables and Prompts. It's fine to roll them at the table and take a moment to interpret the results—the more you do it, the easier it gets. The game is built around travelling the map to encounter and resolve Myths. That's the core loop. Trust the system.
Starting can feel daunting—fair. You'll also see a lot of empty hexes. That's intentional. You'll brush against Omens often enough that threads pile up naturally, and your players won't be able to tug every string right away—that's by design. Meanwhile, not finding something in every hex gives the world scale, creates space for mundane texture and small role-play beats, and lets everyone take a breather.
That said, adding a little more is perfectly fine if it helps you run. Prep to your comfort and to what you expect your table will care about. I suspected my group would be curious about what the Holdings were up to, so I seeded some conflict.
Spark Conflict
Chris McDowall's post on Sparking Conflict is, hands down, the best single trick for turning a quiet realm into a living tangle of problems. The gist: use the Spark Tables to give each Holding its own internal conflict, then define between-Holding conflicts so every pair has something simmering.
Here's the quick procedure:
- For each Holding (A, B, C, D), roll once on Drama, Woe, or News to define an internal struggle.
- For every pair—AB, AC, AD, BC, BD, CD—roll again to define a tension between them.
- Cross-reference with the rulers' relationships. If they're friendly but the sparks say betrayal, perfect—that contradiction is fuel.

Treat results as threads, not facts set in stone. A "Harmonious/Spouse" relationship plus "Coup/Oath" might mean:
- One ruler is planning a "for-the-good-of-the-realm" takeover.
- A third party is stoking rumours to break the alliance.
- An oath sworn long ago forces a clash neither ruler actually wants.
Keep it high level—a line or two per conflict is plenty. Your players are knights; they'll naturally end up dealing with rulers, oaths, and feuds, so this gives you ready fuel.
You can push the same idea down to Dwellings and minor NPCs, but I wouldn't front-load it. Keep the method in your pocket and spark those smaller conflicts when play points at them.
Example
So let's use the example from Chris McDowall to add some conflicts:
I look at the first pair—Roost (A) and Brighthold (B)—and roll on Drama: Manipulation/Assassin. Considering the rulers' relationship, I read the Pigeon Knight's wife ruling another Holding as estrangement (I can learn why later). What matters now is the drama: the Pigeon Knight, in a ruse to hide his hoarded gold, manipulates vassals in other Holdings to extract more. Caya, already fed up and with Brighthold struggling, decides the realm would be better served by a change in leadership. Assassination is a cruel word; she prefers to hire professional problem-solvers.
Add Names
Name things. Not just rulers and NPCs—Holdings, rivers, woods, passes, regions, and the realm itself. What do locals call this valley? That ford? The old path through the forest? You don't need to name everything right away but the things that are very likely to matter sooner rather than later, like the Holdings, the Realm, some terrain regions.
If you're not great at improvising names (I'm not), use generators or light research if that helps, but don't overthink it. The goal is clarity and flavour, not linguistic accuracy.
Start the Game
By this point I felt ready to start. I had enough to run the first few sessions and could iterate as we went.
Paradoxically, the best way I've found to launch a high-agency sandbox is to give the players a clear initial goal. It lets them ease in before the world opens up. If you begin with Knight-Errants (probably the most common start), make them newcomers to the Realm—fitting, since they know nothing yet. If they lack direction, have them seek a Seer's counsel (pg. 5). Then make them travel a fair distance to their goal—not across the whole map, but not next door either. You could also send them to the Seat of Power. That early journey drops you straight into the core loop: overland travel, first Omens, momentum.
What I did instead (and slightly regretted): I built a Seer's Site threatened by bandits and started the party right beside it, fully briefed. It delivered immediate action—one Knight duelled the Bandit Leader and we showcased the excellent combat—but I forgot to have the Seer point them onward. With no Myths encountered yet, the party sat in a directionless pocket. In hindsight, the fix was simple: let the Seer send them to a specific location after the fight. Same strong opening, plus a vector into travel and Omens. Still, my group was experienced enough to set their own goals, and once we hit the road the game corrected itself.
If you're still struggling to see how the game works in practice—or you feel unprepared—watch Quinns Quest's review of Mythic Bastionland. Quinns explains how it sings with remarkably little prep. As he puts it:
"And this—when you start playing—is the point that Mythic Bastionland goes from beautiful into true game design sorcery."
Start anyway—the map, the Myths, and your table will carry you. Rewatch after you've spent time with the book if that "not ready" wobble returns.
Between Sessions
Once play begins, I keep prep light and iterative. Between sessions I focus on prepping tools, not adventures—small aids that make improvisation faster next time. My loop is simple: capture what changed, nudge any off-screen clocks forward, and sharpen a few hooks. To do that, I lean on three practices we'll unpack next: quick improv lore tables that show-not-tell when the party arrives, treating Holdings like Myths so their internal struggles surface as encounterable Omens, and a simple calendar to track seasons and unresolved threads. Just enough structure to maintain momentum; no binders required.
Use Improv Lore
I lifted this from Beardmancer's "One Method to Prep for Improvisation": instead of writing paragraphs of lore, give key NPCs and locations a tiny d6 Mien table (inspired by Troika). Each entry is a verb-forward moment—what they're doing right now when the party arrives.
This turns exposition into show, don't tell. Roll when the PCs meet the person or enter the place; play the result.
Keep entries short, and make sure each does at least one of:
- Reveal something new about the world.
- Relate to another person, place, relationship, or secret.
- Offer something helpful/actionable.
Reveal something new. The point is to deepen understanding through small, concrete moments—habits, traditions, tells. Use these to show personality and culture without monologuing. Some ideas:
- An important ruler harshly reprimands a servant for a trivial mistake—one sentence that telegraphs their temperament and court culture.
- If your realm has a faith (or several), show it in motion: quiet blessings over ledgers, ash-marked brows, market stalls draped with votive ribbons. These bits drip-feed lore in a show-don't-tell fashion.
- Include history by having people act on it. Maybe a ritual carried over from a previous ruler, or commemorating a place with flowers where an old battle was fought.
Relate it to other things. Use entries to weave connections and surface ongoing problems.
- A messenger from another Holding arrives, breathless with news that ties into a known feud.
- Rising tensions between two Holdings? Let it spill into a Holding's ruler's day—cancelled shipments, hostile envoys, guards on edge.
- Commoners heading out to seek guidance from the local Seer after a run-in with something strange.
After you use an entry, cross it out and write a fresh one between sessions. Keep the table small; keep the setting alive.
Example
Let's go back to the example and take a look at Caya the Sage and build a little Mien table for her.
| d6 | Mien |
|---|---|
| 1 | Chewing a root shaped like a person, deep rings beneath her eyes; in an even worse mood than usual. |
| 2 | Watching as two guards throw out an envoy bearing the Pigeon Knight's colours. The envoy mutters: (1–2) "Your husband will hear of this." (3–4) "The gold will find its way to Roost anyway." (5–6) says nothing, but glares. |
| 3 | Handing a sealed message addressed to the Bright Seer to a courier; expects a prompt reply. |
| 4 | Reprimanding locals accused of theft, then softening after being handed something shiny and letting them go. |
| 5 | Taking off her marriage ring before heading out. She won't say where and expects not to be followed. |
| 6 | Kneeling in a spear of light, whispering a sun-litany in a rare moment of solitude. |
Each entry reveals something new about Caya or the world. (2) ties into Roost and the Pigeon Knight; (3) connects the Seer (and possibly their Sanctum). Both are actionable—players can immediately engage. (5) is more personal: who is she meeting? I don't need to know yet; I'll decide when it matters (or connect it to another spark if I already have a strong idea). The remaining entries feed setting texture—Brighthold's corruption, lived religion, folk medicine.
Treat Holdings as Myths
I've written before about Settlements and Factions—both solid tools—but I like when procedures rhyme with the core game. For Mythic Bastionland, I've been experimenting with treating Holdings like Myths. I picked up the idea from the "Encounter Collections" in Beardmancer's post; I treat each entry as an Omen that escalates as the situation develops.
This lets a Holding's internal struggle progress over time, or use it to advance a conflict between Holdings if you want higher stakes. When the party enters that hex, they might encounter the next part instead of a Myth Omen; once the struggle concludes, I sketch a new tension to replace it next season.
Not every beat needs to be grim. Ongoing life works too—tourney preparations gathering steam, wedding logistics turning political, the slow unwinding after a notable death. The Drama/Woe/News spark tables make great seeds with plenty of interpretations.
As with Myths, Primacy of Action (pg. 16) applies. Player choices can jump the queue, derail an Omen, or resolve the whole thing early.
Example
So how does this look in Brighthold? To avoid introducing too much new stuff, let's use the conflict with Roost. Caya is interested in hiring "professional problem-solvers" to deal with her estranged husband, the Pigeon Knight, and his gold-hoarding manipulations. Let's define some Omens:
- Brighthold feels more desolate than usual. Children line dead pigeons along the main path; adults hand out a simple meal for the work.
- Three of Ogan's men stagger out of a common house, looking for trouble, mocking any knightly-looking folk as "Pigeon Bastards."
- Steward Demelza announces a temporary tax in preparation for hosting a festival. People groan, but no one acts. Knights are expected to pay twice as much.
- Caya and Ogan ride out. Caya, slightly disguised in peasant clothes, meets Black Verner—a solemn, serious-looking man—at the edge of Brighthold. They confer, then ride away.
- Brighthold prepares for the festival; it looks and smells inviting. The Pigeon Knight and other rulers are expected. Black Verner arrives with four equally serious companions and heads to the keep to meet Caya.
- The festival begins: music and a communal feast for peasants with games; knights are duelling in the bailey. The Pigeon Knight slips towards the latrines for a quiet moment. Black Verner and his companions follow—grim smiles, hands moving to steel.
This is a quick example of the approach. The conflict should progress gradually, giving players chances to engage. Keep Primacy of Action in mind: if table events would invalidate an entry, skip or revise it later—for example, if the Pigeon Knight wouldn't plausibly be present now. Likely cast: Ogan's men, Black Verner and his crew, and possibly Ogan or Demelza. I'll stat them only when needed or lift suitable profiles from the book.
Track the Calendar
I love using calendars, but I didn't have one ready at the start—my players even asked for it. Luckily, Chris's Mythic Calendar is simple to run, and this session sheet is handy at the table. I set mine up in Fantasy Calendars and use it (as in my post) to track off-screen events and threads the players left loose.
Because Mythic Bastionland often jumps ahead in time—sometimes between seasons or ages—the calendar is a memory aid, not a simulation. I keep it light:
- Log notable days only: long journeys, festivals, oaths sworn, first/last snows, big Omens, downtime.
- Track off-screen timers/clocks (raids brewing, a tourney taking shape, a wedding approaching) and tick them forward between sessions.
- Leave reminders for unresolved situations so we know what's waiting when time skips.
That's enough structure to keep the world moving without bogging play down.
If You've Got Extra Time
These are nice-to-haves, not requirements. If I'm bored or have a spare 10–15 minutes, I'll pick one small thing that adds texture without increasing cognitive load at the table. Typical candidates: jot a few rumours, sketch a lightweight Site I can drop anywhere, or pre-roll a couple sparks for upcoming Myth Omens. None of this is critical—the game runs fine without it—but each pass gives the realm more grain and gives me more toys to riff on in play.
Write Rumours
Write new rumours whenever you can—about Myths, people, places, ongoing events, Sites, secrets, even made-up history. You'll never "finish" the list; I jot a couple between sessions and riff during play.
Keep rumours short (one sentence), specific (a place, person, or sign), and actionable (a direction or hook). If you want extra mileage, note who is likely to spread each rumour, then let the party decide which voices they trust.
Build Sites
Sites are great and underused. I know folks who put a Site in every hex; you can, but that's a lot of work. I use them sparingly.
Two ways I like to use them:
- Upgrade a Landmark. Take an interesting Dwelling/Sanctum/Monument/Hazard and give it structure. Roll an internal problem and let the Knights solve or bypass it. A Seer's Sanctum becomes a short, dangerous approach rather than a quick stop; a Dwelling might be dealing with a murderer in their midst or fear of nearby bandits. Chris has several examples: Dwelling, Sanctum, Monument, Hazard.
- Keep a pocket library. Prep a few drop-in Sites tied to terrain rather than a specific hex. When travel feels flat or a rumour bites, slot one in.
If you want quick layouts, Mythscribe has a handy generator that randomises a Site's nodes and connections.
You can also blend a Myth with a Site: let an Omen occupy or replace a node so progressing the Site nudges the Myth forward (and vice versa). It takes light improvisation, but the payoff is strong.
Prep Myths
Sometimes an Omen reads a bit sparse, or it name-drops someone not in the cast. No problem—lean on the book's tables (or my MB Generators) to fill the gaps. Because only a handful of Myths are active at once, you usually know which Omens are coming next (just not when). I pre-roll a few sparks and turn them into tiny, table-ready notes.
If an Omen feels fiddly, I add a tiny diagram or sketch—arrows, labels, nothing fancy—so I can explain it cleanly at the table.
Resist going long. These are prompts, not scripts. Keep it punchy so Omens move; if you've got surplus time, sure, grow one into a small Site, but do that sparingly so the Myths don't bog down.
Conclusion
That's my current process for shaping a Mythic Bastionland realm. It can sound like a lot—and on low-inspiration days, some steps are work—but the cure is to start play. Play gives you momentum, shows you what actually matters, and makes the next pass easier.
Keep prep light and iterative: a map, some Landmarks, a handful of Myths, and rulers with a quirk or two. That's enough.
Remember the core loop: travel + Omens + choices. When you need detail, roll a spark, interpret it, and move. Trust the system; it's built to carry you if you keep the wheels turning.
Resources
A small collection of Mythic Bastionland–specific posts, tools, and ideas I've found helpful.
Blogs
- Anything from Chris McDowall's blog is gold. A few favourites:
- Beardmancer Bungalow:
- Patchwork Paladin - Mythic 5e
- Githyanki Diaspora - Mythic Bastionland: What Do the Seers Say
- Gnomestones - Map-Making with Mythic Bastionland
Videos
- Bastionland YouTube (streams). Particularly:
- Quinns Quest Reviews: Mythic Bastionland
- Companion read: interview with Chris
- Plus One Exp - Mythic Bastionland Actual Play
Podcasts
Tools
- Mythic Bastionland Generators for Sparks and Prompts
- Mythic Bastionland Referee Companion
- Mythscribe's Site Generator
- Mythic Bastionland Tools Realm Maker
- HexPad
Misc
- Mythic Bastionland Jam submissions — lots of excellent community content.